One of the things that most attracted us to Astro was its agnostic approach to UI frameworks – we’re Vue enthusiasts and having the ability to include our existing components was hugely convenient.
It also presents a low barrier to trying out other frameworks like Lit, React, Solid, and Svelte.
There’s been a lot of hype recently about Svelte and we’ve been watching its growth with interest and looking for an excuse to take it for a spin.
That means first learning it. We found the Learn Svelte Tutorial on their website to be thoughtfully designed, with a REPL built in so you can write code along with each lesson.
The app we’re gonna build
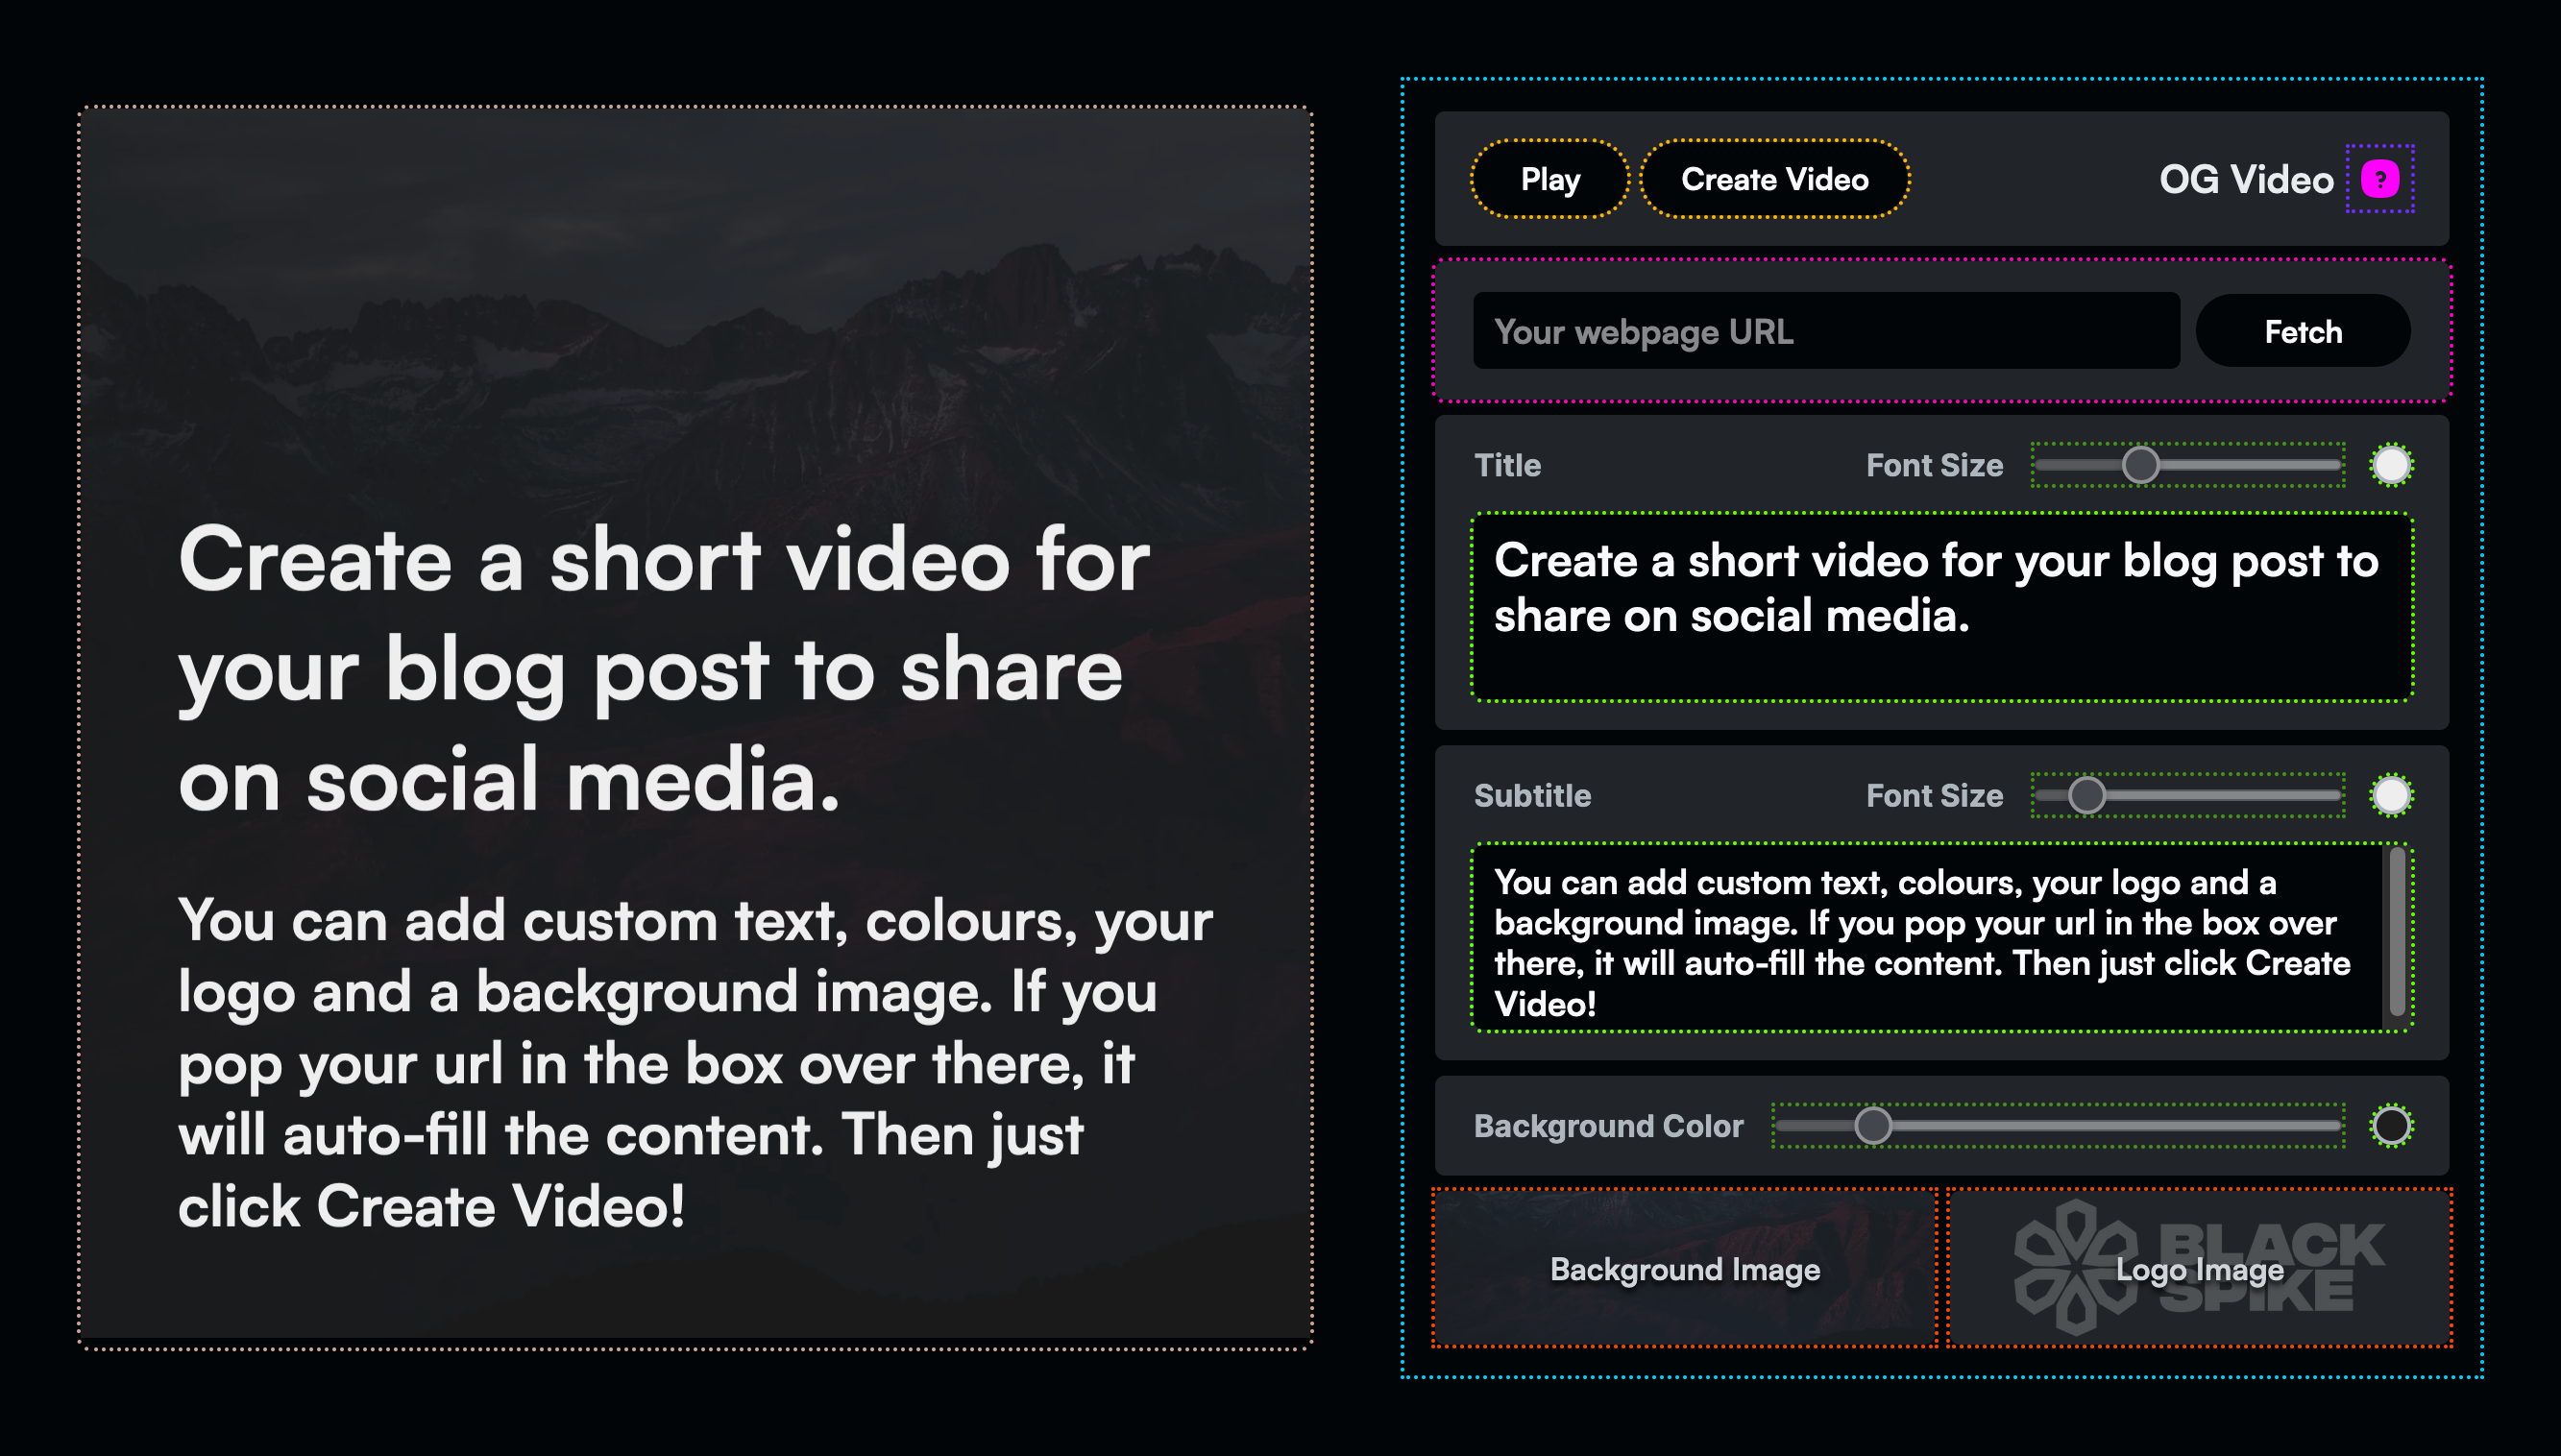
We started making animated videos to accompany our blog posts on LinkedIn. After making two we decided screw this, let’s make a tool to churn them out instead.
We’re going to have to make a lot of blog post videos to recoup ThE TiMe wE SaVeD making this app.
Real-world application stuff
This app is just a fun side project, but it demonstrates real requirements you’d have in any SPA.
1.Canvas- We need to record the screen to video, and canvas is the way to go. Requires integration of third-party scripts (Fabric.js)
2.Help page- Going to need routing
3.Actions- Will require component-to-component communication
4.Fetch external website data- A serverless function to scrape OG meta tags from websites
5.State store6.Image uploader- Upload logos and backgrounds and save blobs to
localstorage
A place to sync state (text, colours, images etc)
Getting set up
The docs recommend a full-fat SvelteKit install over plain Svelte, and as we’ll need routing and state we may as well try it
npm create svelte@latest ogvideoStyles
We love open-props for design tokens and sass so we’ll install those too. Looks like getting pug working isn’t straightforward, so we’ll just write html in full like neanderthals.
Added a global sass file in /assets/css/main.scss, import open props into that with @import "open-props/style"; and import that into the page script tag with import '../assets/css/main.scss'. Success!
Adding sass in a <style lang="scss"> block to the page throws errors. Googling doesn’t reveal anything helpful. Nevermind! We’ll do this sass-less ¯\(ツ)/¯
Components
We’ll scaffold out /components/Canvas.svelte and /components/Controls.svelte.
Importing and using components is the same as Vue, though Svelte has a cleaner way of passing props:
<script>
  import Canvas from '../components/Canvas.svelte'
  const message = 'cool'
</script>

<Canvas {message} />
and in Canvas.svelte
<script>
export let message
</script>

<h2>{message}</h2>
Svelte class bindings and event handling
A good example of Svelte basics is our image uploader component, which uses Svelte’s native event handlers to receive a file/set the class and save the image blob.
<div
	class:dragOver
  on:dragenter={() => (dragOver = true)}
  on:dragleave={() => (dragOver = false)}
  on:drop={handleDragDrop}
>
Routing
Adding an about page is as easy as making a /about/+page.svelte in the routes directory.
It’s a slight annoyance that you can’t call the page +about.svelte, you end up having loads of +page.svelte’s in your file search.
Linking to pages uses standard html <a href="/about"> links, unlike <nuxt-link to="/about"> in Nuxt.
State store
We were impressed by Svelte’s built-in state management, even simpler than pinia which we love in Nuxt.
Add a store.js to the root and add
import { writable } from "svelte/store"

export const title = writable("I'm a title!")
And in your component
<script>
 import { title } from '../store.js'
</script>

<h1>{$title}</h1>

<input bind:value={$title}>
And you have a reactive app-wide variable! There are probably a lot more features like actions & mutations, but for our simple app, this will suffice.
We’ll declare a store variable for each text, font size and colour input.
Thank Fabric for Canvas
Working with a raw canvas is a bit of a dog, so we installed Fabric.js, a powerful and well-documented library that allows you to easily add text, images and geometric shapes.
Adding a new fabric canvas doesn’t take a lot of code. We need to use Svelte’s onMount as we need to grab the html canvas by its ID once the app has mounted.
<script>
  import { onMount } from 'svelte'
  import { fabric } from 'fabric'
  import { title } from '../store.js'

  let canvas, titleText

  onMount(() => {
    canvas = new fabric.StaticCanvas('canvas')

    titleText = new fabric.Textbox($title, {
      width: 400,
      fontFamily: 'sans-serif'
    })

    canvas.add(titleText)
  })

</script>

<canvas width="640" height="640" id="canvas" />
Now we have a canvas with text from the store on it!
However, the text is not reactive. When we update the input, the text doesn’t update.
To fix this, we can use Svelte’s super minimal watchers/computed properties, with nice clean syntax: $: thingToWatch, functionToCompute()
In our case, we’ll watch the title store variable, and re-render the canvas on change.
$: $title, updateTitle()

function updateTitle() {
  titleText.set('text', $title)
  canvas.requestRenderAll()
}
Animating the canvas
This isn’t a post about Fabric or animation (we’ll save that for another time) so suffice it to say we added a rectangle background and used anime.js (similar to GSAP but leaner) to create a timeline that animates the text and images. You can wade through the full spaghetti of code here.
anime
  .timeline({
    update: () => canvas.renderAll()
  })
  .add({
    targets: titleText,
    opacity: [0, 1],
    duration: 1000,
  })
We exposed the start and reset anime timeline methods, in Svelte you do this with a simple js export function play() {...}, more intuitive than Vue’s defineExpose().
There are some Vue-similar shenanigans to get sibling communication working. When we click the play button in Controls.svelte we had to create a dispatcher
import { createEventDispatcher } from 'svelte'
const dispatch = createEventDispatcher()

const play = () => dispatch('play')
Then in the parent, we listen to those dispatches, which trigger a function that calls the function in the canvas. Functions all the way down – not too tricky but feels a little brittle and probably something we should handle in the state store instead. +page.svelte looks like
<script>
  import Controls from '../components/Controls.svelte'
  import Canvas from '../components/Canvas.svelte'

  let canvas
  const play = () => canvas.play()
</script>

<div>
  <Canvas bind:this={canvas} />
  <Controls on:play={play} />
</div>
Recording the canvas
We’d never tried to record html to video before, so it was interesting to learn the MediaRecorder API
This source media can come from a stream created using getUserMedia() or from an audio, video or canvas element.
We found it extremely easy to copy and paste someone else’s code and were delighted to find it just worked.
We needed only to increase the videoBitsPerSecond to improve the quality and save the stream to the state store.
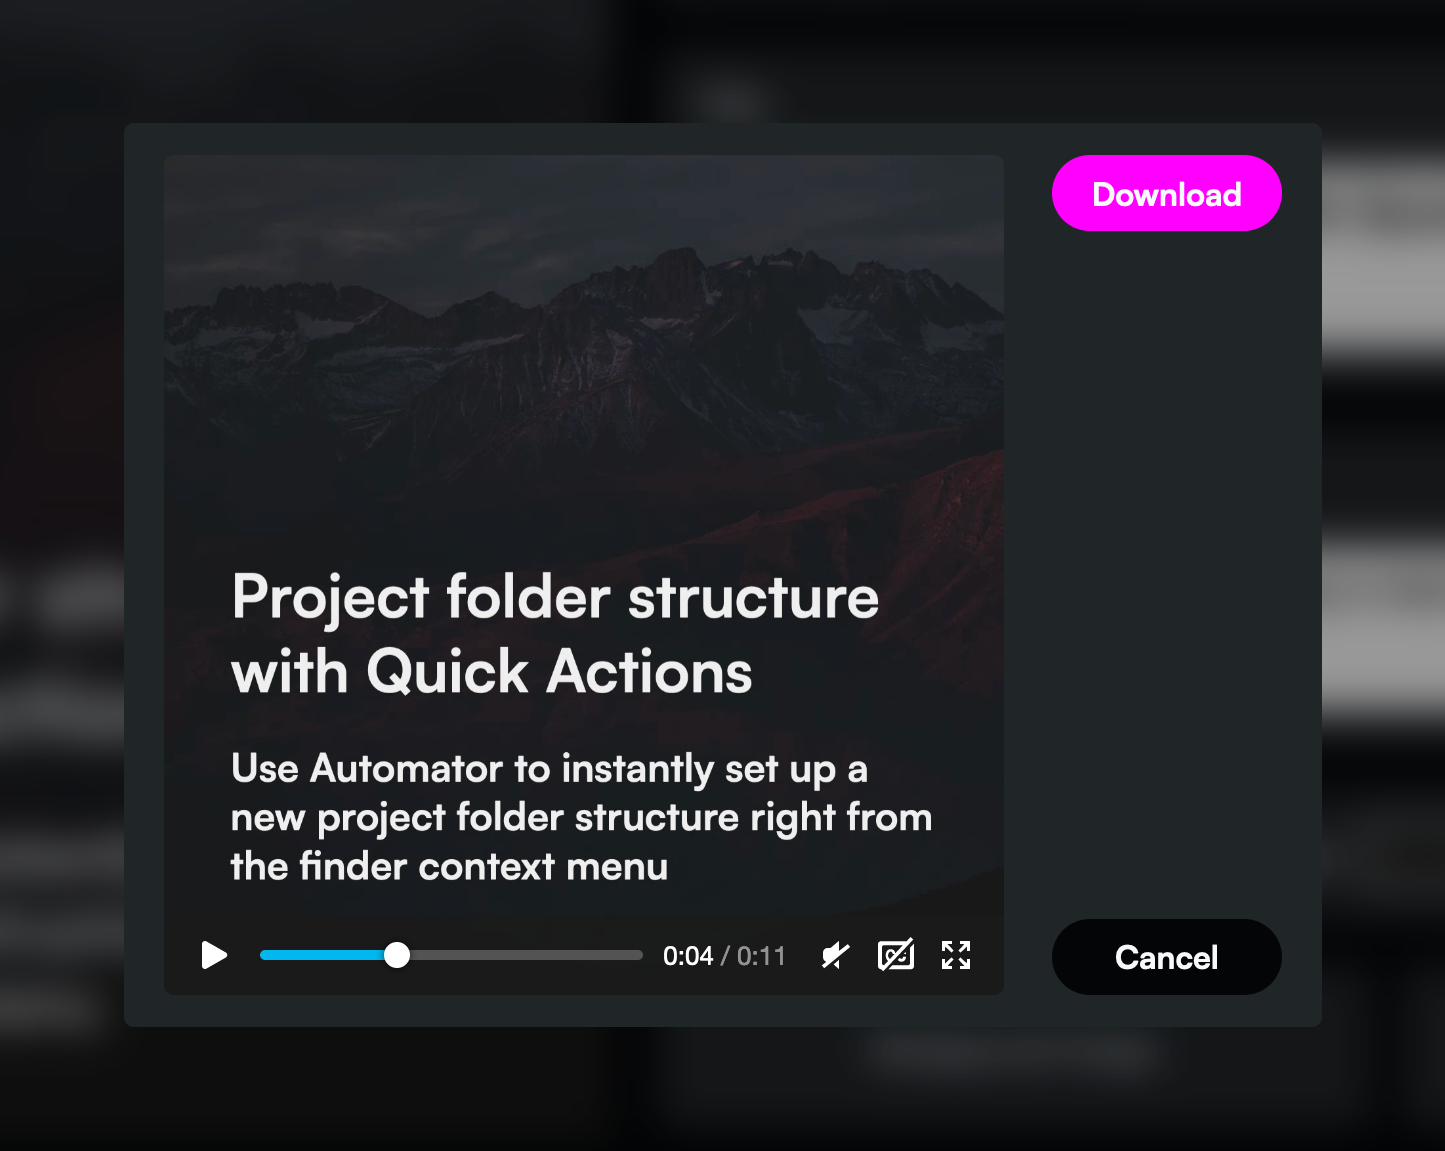
Native html dialog element
When the video finishes recording, we note that in a store variable, and we have a VideoDialog.svelte component that watches for a change on that var which triggers a show dialog function.
It’s great that the browser now has a native dialog element, allowing us to avoid accessibility footguns. That it’s so easy to style (including the dialog::backdrop pseudo-element) is a huge boon.
The code:
<script>
  import { video } from '../store.js'
  import { onMount } from 'svelte'

  let dialog, videoEl

  onMount(() => dialog = document.getElementById('dialog-video'))

  $: $video, toggleDialog()

  const toggleDialog = () => {
    dialog.showModal()
    videoEl.src = $video
  }
</script>

<dialog id="dialog-video">
  <form method="dialog">

    <video bind:this={videoEl} autoplay controls muted playsinline />

    <a href={$video} download="og-video">Download</a>
    <button value="cancel">Cancel</button>

  </form>
</dialog>

<style>
  dialog {
    margin: auto;
    border: 0;
  }
  dialog::backdrop {
    background: rgb(0 0 0 / .4);
    backdrop-filter: blur(1rem);
  }
</style>
Scraping webpages for Open Graph data
After entering a title and subtitle enough times we decided the computer should do it for us. We wanted to scrape the title and description from any web page and populate the app automatically.
As we host our apps on Netlify we can create a serverless function, .netlify/functions/scrape.js.
In that, we use cheerio’s jQuery-esque syntax to load the URL passed from our front end form and grab the og:title and og:description and pass that back.
import * as cheerio from 'cheerio'
import axios from 'axios'

export async function handler(event, context) {

  const data = JSON.parse(event.body)
  let url = data.url
  const meta = {}

  await axios
    .get(url)
    .then((res) => {
      const $ = cheerio.load(res.data)

      meta.title = $('meta[property="og:title"]').attr('content')
      meta.subtitle = $('meta[property="og:description"]').attr('content')

    })

  return {
    body: JSON.stringify(meta)
  }
}
In our front end component we call it and update the store (and canvas)
<script>
  import { title, subtitle } from '../store.js'

  let fetchLoading, url

  const scraper = async () => {
    fetchLoading = true

    const res = await fetch(`/.netlify/functions/scrape`, {
      method: 'POST',
      body: JSON.stringify({ url })
    })

    const meta = await res.json()

    $title = meta.title
    $subtitle = meta.subtitle

    fetchLoading = false
  }
</script>

<form on:submit|preventDefault={scraper} class:fetchLoading>
  <input type="url" bind:value={url} placeholder="Your webpage URL" />
  <button on:click={scraper}>
    {fetchLoading ? 'Fetching…' : 'Fetch'}
  </button>
</form>
Some cool Svelte stuff here is the form submit with prevent default on:submit|preventDefault={scraper} and binding a loading class with class:fetchLoading.
Eventually we added some code to populate the url from a query parameter, again on mount
onMount(() => {
  const params = new URLSearchParams(location.search)
  const urlParam = params.get('url')

  if (urlParam) {
    url = urlParam
    scraper()
  }
})
So now you can populate the app via url. Neato!
https://ogvideo.blackspike.com//?url=https://bbc.co.uk/sport/football/65290302
Porting the app to Vue
Converting the app to Vue (with Nuxt, to match Svelte’s Kit) was an enlightening way of comparing the two frameworks.
Some things we prefer in Vue
- In-HTML directives like
<div v-for="x in y">and<li v-if="true">feel nicer than Svelte’s logic blocks{#if user.loggedIn}, but we appreciate that’s down to individual taste. The Vue way feels more compact and HTML’y to us. - Surprised not to have Portals/Teleport built into Svelte. Was a pain with the Dialogue box.
- Better pug and sass support
- You can just drop Vue.js in as a standalone script on a page rather than having an app you have to build
- Nuxt: great to have auto import of components and
<script setup>reduces imports even further - Nuxt: more logical page file names
Things we liked in Svelte
- We already mentioned the simple watchers/computeds and minimal class bindings
- It’s a joy not having to put
.valueeverywhere - CSS scoped by default, and no need for
setupor<template>is a minor bonus - It seems more logical to have props as
export let foooverconst props = defineProps({foo}) - SvelteKit: Great that stores are first-class citizens
That Svelte requires compiling and Vue doesn’t obviously forces Vue to have these idiosyncrasies, but they do improve DX.
Takeaways
We were surprised at how easy it was to pick up Svelte basics due to the familiarity to Vue 3, and as you can see from our short lists above, there aren’t giant wins between the two.
Would we build our next Single Page App in Svelte?
Honestly – probably not.
We can see why people love Svelte – it does have some real DX advantages – and it was fun to learn. But for us it simply doesn’t offer enough benefits to merit discarding our years-long Vue and Nuxt experience.
We are excited every time to fire up a Vue or Nuxt project and we’ll be sticking to building with it.
We probably wouldn’t have had the performance issues that we had with Nuxt + Three.js had we built blackspike.com in SvelteKit due to the compilation advantages.
Overall, we enjoyed using Svelte and we’d have no qualms about working on an existing Svelte codebase.
If you need a Svelte app we’d be delighted to build you one – just drop us a message!